Tuesday, July 15, 2008

A brief history of maple syrup making


Some History of Maple Production

Maple syrup production goes so far back in American history. Most historians accept the idea that the Indians taught it to the early settlers.

American Indians, however, were accomplished woodsmen that used what they could from their surroundings. They were also very observant; they had to be to survive. They discovered herbs for flavoring food and for medicinal purposes. They used tobacco in their peace pipes. At the end of winter, when all the stored grain and vegetables were gone, the Indians had plenty of motivation to find some variety in their diet and to use what they could to keep warm and survive. Once the Indians boiled the excess water out, the maple sugar that was left could be a source of energy and flavoring that they could store in cakes to use during the rest of the year.

Indian Names

Different Indians had different names for the maple tree and its products. The Algonquin called maple sugar sinsibuckwud. The Ojibway said sheesheegummavvis, meaning "sap flows fast." The Cree called the maple tree sisibaskwattick. The Anishinabe of Minnesota called it aninaatig ahfiwaagamizigan (maple syrup).

The Legends

Indian tribes share various legends about how maple syrup was first made.

Nokomis

The Legend of Nokomis (the land), tells about Nokomis' granddaughter, Manabush tasting the drips after Nokomis had tapped the maple tree to collect syrup. Manabush felt that men would get lazy if all they had to do was to poke the tree, so she grabbed a bucket of water, climbed the maple tree and poured water into the center of the tree, diluting the sweet sap to only 1% to 2% sugar, She made it necessary for men to always work hard to get the syrup.

Glooskap

A similar legend. called the legend of Glooskap tells that the Creator had long ago filled the maple trees with syrup that flowed year-round. Glooskap known by different names to different tribes (Gluscabi. Kuloscap, Manabozho, Odzihozo, or Djokabesh), comes along to one of his People's villages. There are no cooking fires and the gardens are overgrown. The children and dogs don't run out to meet him. Glooskap finds the people in the maple grove, lying down under the maple trees with theireyes closed, letting the sweet sap drip into their open mouths. Dipping into the nearby lake with a birchbark bucket he reaches up and fills the trees with water, thereby diluting the sap. "Rise up, People. The trees are no longer filled with the maple syrup the Creator gave to you. It is only watery sap. Now you will have to hunt and fish and go back to growing your corn, beans and squash."

The Algonquin Chief

A different legend relates the experience of an Algonquin chief He struck a maple tree with his axe one day. His wife saw the treewound dripping. She collected the sap in a wooden bucket and used it to boil the meat for supper. Both the chief and his wife were amazed at the sweetness of the meat that night.

Iriquois

An Iriquois legend simply says that one of their youths watched a squirrel run up a maple tree and bite off a twig. The squirrel licked the sap off the twig. When the Iriquois youth tried the same, he found the sap was sweet. Canadians have observed red squirrels running around from maple tree to maple tree nipping and creating deep wounds. After the wounds have exuded some sap, the squirrels return and eatthe sugar crystals.

The Indians observed their surroundings. As forest dwellers, they had developed quite a sophisticated forest technology. If squirrels could do it, the Indians could definitely build on the squirrels' tactics.

Indian Sugar Production

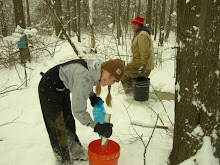
For centuries Indians have tapped maples, gashed the bark under the tap in a V-shape and put out large birchbark bowls under the tap for collection. Earlier Indians would pour the sap into a hollowed out log or birchbark or clay kettle and drop hot rocks into the cooking vat until most of the water was boiled away. You can only imagine the dark color and the strong flavor syrup produced in this manner would possess. Later Indians would pour the sap into a clay or iron kettle held over a campfire, this lead to a better product where the maple flavor was more pronounced.

Sugar Camps

Eastern woodland natives no matter how far they wandered in the winter for food could return to the maple groves, their ancestral "sugar camps." each spring and start the tapping process all over again.

Indian Sugar

Early White explorers wrote about the Indians having three types of maple sugar. "Grain Sugar" was a coarse granulated sugar similar to our brown sugar. "Cake Sugar- was poured into wooden molds to make blocks or rakes. "Wax Sugar" was extra thick sugar that was poured over snow, which is what we simply call "sugar on snow." Indeed, a few, very old maple trees show indications that the Indians were tapping long before the Europeans touched the American shoreline.

Settlers Sugar Production

17th and l8th Century

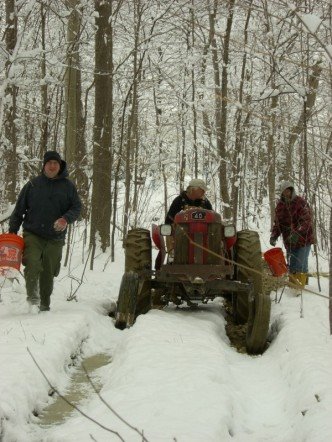
When the Europeans came to Eastern Canada 300 years ago they noticed the Indians used a dark sugar with a distinct taste-the first kind of sugar produced in North America, The Indians taught the settlers how to collect maple sap, and the settlers added their own technology to the process. The Europeans used their augers to bore the tap holes, devised wooden spiles (spouts), hung wooden buckets from the spiles, and used their iron kettles to boil the sap.

At this time, maple sugar was a major source of high grade sugar for the French settlers. Imported white sugar was extremely expensive and hard to get. During these 200 years, Americans boiled virtually all of the sap they collected down into sugar. This was done as the Maple syrup would not keep well, however the sugar kept indefinitely.

19th Century

During the 1860s, a combination of developments pushed maple production to its peak. The Civil War soldiers desperately needed a source of good food that wouldn't spoil during shipment and storage. Soon, sheet metal began rolling out of American foundries, making all sorts of new applications possible. Among the first was the tin can. Not only did the can help the cause of the Civil War soldier, it was also a boon for sugarmakers who could now preserve maple syrup to use and sell year-round. Metal sap pails followed with lids to keep debris from falling into the sap.

By the 1900s, sugarmakers had devised a flat-bottomed pan with baffles and channels in the bottom. With this method the heat from the fire could make contact with a larger volume of sap and boil the sap down much faster, hence the flue pan was invented. These were the precursors of the modern evaporators.

20th Century

In 1959 plastic pipeline for use in maple sap collection was invented. For twenty years or so developers struggled with various problems with the plastic tubing. By the time of the energy crisis in the 1970s, however, plastic tubing's problems had been straightened out.

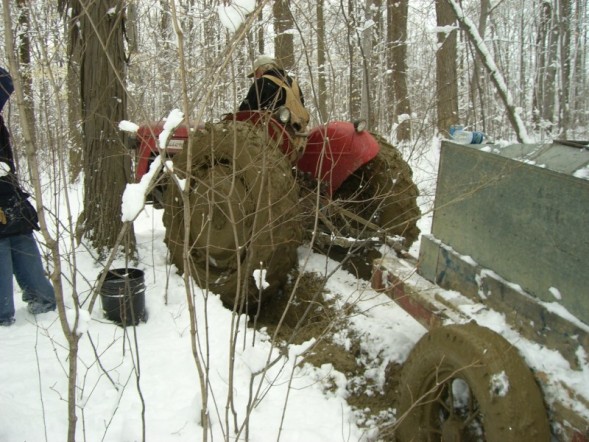
Because of the oil crisis in the 70’s, Canadian and United States agriculture departments focused on energy-efficient production of maple syrup. With the addition of vacuum pumps to the plastic tubing maple producers could now make even slow runs worth the effort to fire up the evaporators. The trees still had to be tapped and the pipeline strung, but the maple producer did not have to enlist a large crew of gatherers to work through the sugarbush and collect the sap from each bucket. The sap from each tap now runs by gravity through the plastic tubing downhill to a collecting tank, ready to be collected and taken to the sugarhouse.

In the 1970s, some sugarmakers starting using a process called reverse osmosis. This process separates water from water-soluble solids and can reduce the boiling process in half or more.


(all info in this post compliments of Green Mountain Maple Sugar Refining Company)

Wednesday, July 9, 2008

Maple Sugar (Granulated)


Back in colonial times a good amount of the maple syrup was processed down into maple sugar. This way made it easier to store and transport and it could easily be changed back into syrup by adding water. These days, maple sugar can be substituted partially or completely as a substitute for cane sugar, depending on how much of a maple flavor you want. Try it out as a sweetener in your cereal or tea, or even as a substitute when baking, or when making sauces or glazes for meats. (Just a side note maple syrup in its pure form works great as well with many of these suggestions especially tea.)

Now lets make some maple sugar! Take your maple syrup and boil it to a temperature 40 to 45°F above boiling pure water (boiling water is 207-212°F so you would need your syrup to be 247-252°F) Once you reach this point you need to immediately transfer the syrup to a flat pan or trough, stirring until it reaches granulation and all of the apparent moisture is gone. The next step is to sieve the sugar through a coarse screen (e.g., 1/8-inch hardware screen) to assure all of your product is uniform. Try to pick a day with a low humidity because this can make your sugar making a difficult task.

Monday, July 7, 2008

Mead Made Easy: Honey-Maple Mead


I was browsing through the internets today and i stumbled upon this guys honey maple mead mix. Normally i will write my own stuff on this blog but since i have no experience in making maple honey mead i will give credit where credit is due. Anyway, good luck trying to make this and i will let you know how i do when i get around to trying this out.

http://davespicks.com/writing/mme/recipes/honeymaple.html


Source: Joseph Nathan Hall
Mead Lover's Digest #7, 3 October, 1992 Ingredients (for 2 gallons):

  • 2 quarts maple syrup (that hurt$, as Charlie Papazian says)
  • 2 to 2-1/2 lbs light honey (I used clover)
  • Acid to taste--I think I used a little less than 1 tsp of acid blend for this batch.
  • Pasteur champagne yeast
Directions:
  • Bring honey and maple syrup to boil in enough water to liquefy.
  • Add acid and a bit of nutrient if desired. (I don't think you need yeast nutrient--the maple syrup seems to have the necessary stuff in it.)
  • Skim for a minute or two, enjoying the flavor of the yummy foamy stuff.
  • Cool.
  • Then add water to make a 1.120 SG must.
  • Pitch with working Pasteur Champagne yeast. Prepare for a moderately vigorous fermentation.
  • Rack off after primary fermentation, and once again if it isn't clear in a few more weeks. I topped off the gallon jugs with boiled water after the first racking--that seemed to help settle the yeast.
Notes:
    Both batches I made this summer (the first with about half this much syrup) fermented out to almost exactly 1.000. They fermented and cleared at 70-72 F in six to eight weeks.

    The result (that's what you've been waiting for): a beautiful, crystal-clear brilliant straw-colored liquid, slightly sweet, with a monster alcohol palate and strong bourbon notes. Smoooooth.

    Then, for a stellar, absolutely world-class result, take the three month old young mead and prime with a small quantity of fresh yeast (1/4 pack or less) and about 1.25 times (or perhaps a little more) what you consider a normal dose of sugar for beer. Bottle quickly and carefully, and let age for at least six months, turning and shaking gently a few times during the first weeks.

    The sparkling honey-maple mead will wow absolutely anyone. Serve it ice cold in your best champagne flutes. I rather like the still mead on the rocks. Is this heresy?

Sunday, July 6, 2008

How to make maple syrup candy


INGREDIENTS

All you need is pure maple syrup, 2 cups will make about one pound of candy.

1. Using a candy thermometer, in a sturdy saucepan with high sides, bring the maple syrup to a boil.

2. Turn the heat to very low and allow the syrup to continue boiling without stirring until the thermometer reads 233F. Be careful that the syrup doesn’t boil over - one way to prevent this is to put some butter around the top of the pan. You don't want to put too much butter in the syrup though because it will slow down the process. The syrup will take quite a while to reach the boiling point and even after it is boiling it takes a bit to reach the 233 mark.

3. When the reduced syrup has reached 233F, remove it from the heat and allow to cool, still without stirring it, until the thermometer reads 110F. Another good trick to tell when you should stir the cooling syrup is if you can put your hand on the bottom of the pan comfortably then you will know it is ready to be stirred. This is an important step because if you start stirring to early you will most likely end up with a candy that is too grainy and it will set up right in your pan if you are not ready.

4. Now it's time to stir your syrup. Take your stirring utensil (a large spoon works fine) and start the stirring. The syrup will turn a pale caramel color as it starts to turn to candy. Now the syrup will still take a few minutes to set up but once it starts to change you better have it in the container you plan on using because once it sets up there is no going back. You can try little molds but you will have to practice this and get it down to a science because like i said once it sets up there is no going back. One technique to keep the syrup from setting up to fast is to add a little half and half or butter cream to the syrup and that can help it from setting up and give you a little more time to mold it into shapes, and it can give it a creamier taste as well. I personally like the straight maple candy but that is just my preference. Another little trick is to only take off part of the syrup at a time so you have less to work with if you choose to try molds.

5.Lastly enjoy your finished product!!!


Wednesday, July 2, 2008

How to make maple syrup part 2

How to Do It (scroll down and read part 1 first)

1. Be sure that your trees are sugar maples. Hard maple and soft maple both deliver significant amounts of sap at different times. Black and sugar maples are the first choice when they are available. A hard maple may also be called a rock maple. Any maple you decide to tap should be at least 10" in diameter for one tap hole and container. Now as the tree gets wider in diameter (approx every 8") you can add another tap hole and bag or bucket may be added. A tree 28" in diameter could have a setting of three buckets. Normally trees having lots of branches will better produce than a tree with small tops.

2. Drill the 7/16" hole 3" deep at a height not to high and not to low. Generally i try to make the holes just a bit below chest height. Look for unscathed bark and use a different spot every year that you drill. Never drill closer then 4" to an old tap hole. The hole will not have to be slanted, the sap will run out either way.

3. Drive the spout using a hammer, so that it cannot be pulled out by hand. At the same time be careful not to split the tree.

4. Hang your bag or container on the hook of the spout. If you made homemade spouts, take some wire and use it as a hanger. Make sure you cover the bucket to keep the rain and snow out otherwise you will be spending much longer in front of the fire as you boil (higher water content equals longer boiling from sap to syrup).

5. Once you go gathering make sure you have your "evaporator" (backyard fireplace or kitchen stove)ready to go.

6. Ok, The sap is running! Depending on the weather you could be overflowing or you may just have a little in your buckets. It is important if it stays above freezing for more then a couple days that you boil your sap asap(haha get it? asap.....eh never mind). Sap left out in the sun will collect a high level of bacteria and it could cause your syrup to spoil. So, you have enough sap in your buckets to boil it down - you are ready to start your fire. Don't fill your pan completely or it will boil over. Keep a stick of butter or margarine handy to rub around the top of your boiling pan and this should keep it from boiling over. The water will boil away and you just keep adding more sap to the pan. Never let your pan level go below an inch or you may burn your pan. You can mix the cold sap with the boiling sap it will still turn out alright. As you see your wood pile vanishing you may wonder if you'll ever have fresh syrup. Hold tight though because nothing is quite as tasty as some home made maple syrup! It takes roughly 40 gallons of sap to make one gallon of syrup. These numbers will vary slightly throughout the season but as a rule of thumb normally its 40:1 so plan on being at this boiling process a while. A chimney made of brick or a stove pipe (4 to 6 and 1/2 feet long) on your arch or outdoor fireplace is suggested for keeping the smoke away from the boiling sap so that the syrup will not darken or have an off-taste from the smoke.

7. As i mentioned earlier, do not leave sap in the collecting buckets for more then a few days, especially in warm weather. Ideally you should gather every time the sap runs. Also, try to store your sap in a cool area and as soon as possible. Naturally, you should boil it as quick as you can.

8. Finished maple syrup is 7 degrees F. above boiling water. Your trusty syrup or candy thermometer will show you this. We use a syrup hydrometer and a testing cup, if you decide to go larger scale you may want to use those items. A syrup hydrometer will tell you when the syrup is done. The cup will require two or three cupfuls of syrup in order to make the test. Syrup is thicker than water hence it weighs more. Accurate syrup should weigh at least 11 pounds per gallon. Don't go beyond 11 1/4 pounds per gallon or it could form crystals in the bottom and around the top of the storage container.

9. Next it is important to strain your syrup to make sure there is no dust or other debris. Pour hot syrup through a syrup filter made of felt or a strainer that you can purchase through specialty equipment dealers. If you don't have either one, a double outing flannel layer will work or, you could let the syrup cool for twelve hours or more. Sediment will settle at the bottom of your container and then you can pour off the quality syrup. Syrup should always be reheated to at least 180 degrees before it is poured into containers for final storage.

10. Now it's time to pour your hot syrup into your clean, sterile canning jars and seal. You will want them full as possible so that very little air will be in the jar. For a better seal lay your jar on it's side while the syrup is still hot.

11.Always store your syrup in a cool place. We keep ours in a unheated garage until it gets warm and then we transfer it to an air conditioned trailer that we utilize for a variety of things. If your garage is to warm or you do not have a garage or a cellar or even a basement i have read that a freezer is also ideal. Plus properly prepared syrup won't freeze on you and a poor seal will not be as important when you store your syrup in a freezer.

12.You could also visit a commercial maple producer for some more tips on how to make syrup. Most producers welcome visitors and will even give you a free tour. You can obtain locations of producers from the local extension service office in your town.

How to make maple syrup

Yes, you can make maple syrup (and sugar)from the trees in your own backyard, even if you only have a few. The basic method is simple and has not changed since we borrowed the idea from the indians. You tap the tree, boil the sap down till all the water is gone and presto changeo you have yourself some good old fashioned maple syrup. It's hard work, but the end results are tasty and the whole process itself can be a rewarding one!

What Will You Need?

1. A bitstock and a bit (any 7/16 inch bit will do) to bore the hole.

2. Spouts -(one for each hole) - you can buy manufactured spouts from a maple equipment outfit, of which their are many in the northeast part of the united states. Also i have read that you can make a wooden spout by selecting an elderberry stem a little larger than the hole to be filled. Then Cut it off four to five inches long. Sharpen one end to go into the tap hole. Use a slender rod to push the pith or heart wood out of the center and you have your spout.

3. One container to catch the sap per tap hole. We use a blue bag (if you go the bag wrote i highly suggest using a blue one because it will keep out the suns rays and prevent bacteria from forming faster then it would otherwise)specifically made for this purpose. Other options one could try would be a bucket or wooden, metal, or plastic pail. Rusty cans or pails may be used by placing a plastic liner or polyfilm bag inside the container. We used to use pails but we have 600-700 taps and you can imagine how much work it is to clean that many buckets. I have also read of folks using plastic gallon milk or cider jugs. These allegedly work well in combination with a wood, metal, or plastic spout. You could use an electric drill or other cutting tool to make a hole in the top of the flat side of the jug. Make the hole large enough so that it can be slipped over the spout.

4. We have a smaller operation on our farm but we still have a pretty big storage tank (1000 gallons) and it is a galvanized tank. However the amateur could use some clean galvanized or plastic trash cans, larger pails or something similar.

5. You will also need a deep metal pan such as a canner or wash tub that can hold five gallons or more. This will serve as your evaporator pan for boiling down the sap into the yummy syrup.

6. As for your choice of where to boil you have a few options. 1. A fire place in the back yard would work well if it was set up proper, even one that you could make temporarily from brick, cinder blocks or stone to fit your boiling pan would be fine. Another option could be a wood stove set up outdoors. You can even attempt to do this project in your kitchen on your stove top, but i don't recommend this option.

7. When cooking out doors you will need dry, fast-burning wood it is essential as it provides the heat necessary for boiling. Slab wood, dead trees, etc. are perfect, as long as it is dry.

8. For testing to see when the syrup is done you need a syrup or candy thermometer. A litle side note here, maple syrup when boiling is 7 degrees hotter then boiling water.

9. When you are finished, store your syrup in previously purchased plastic jugs. You could also use clean metal containers or glass jars that will seal - canning jars are perfect for this.

10. It is very important to be sure that all collecting, boiling, and storage containers are kept clean to avoid off-flavor, contamination and other problems.