How to Do It (scroll down and read part 1 first)
1. Be sure that your trees are sugar maples. Hard maple and soft maple both deliver significant amounts of sap at different times. Black and sugar maples are the first choice when they are available. A hard maple may also be called a rock maple. Any maple you decide to tap should be at least 10" in diameter for one tap hole and container. Now as the tree gets wider in diameter (approx every 8") you can add another tap hole and bag or bucket may be added. A tree 28" in diameter could have a setting of three buckets. Normally trees having lots of branches will better produce than a tree with small tops.
2. Drill the 7/16" hole 3" deep at a height not to high and not to low. Generally i try to make the holes just a bit below chest height. Look for unscathed bark and use a different spot every year that you drill. Never drill closer then 4" to an old tap hole. The hole will not have to be slanted, the sap will run out either way.
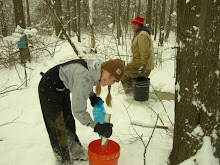
3. Drive the spout using a hammer, so that it cannot be pulled out by hand. At the same time be careful not to split the tree.
4. Hang your bag or container on the hook of the spout. If you made homemade spouts, take some wire and use it as a hanger. Make sure you cover the bucket to keep the rain and snow out otherwise you will be spending much longer in front of the fire as you boil (higher water content equals longer boiling from sap to syrup).
5. Once you go gathering make sure you have your "evaporator" (backyard fireplace or kitchen stove)ready to go.
6. Ok, The sap is running! Depending on the weather you could be overflowing or you may just have a little in your buckets. It is important if it stays above freezing for more then a couple days that you boil your sap asap(haha get it? asap.....eh never mind). Sap left out in the sun will collect a high level of bacteria and it could cause your syrup to spoil. So, you have enough sap in your buckets to boil it down - you are ready to start your fire. Don't fill your pan completely or it will boil over. Keep a stick of butter or margarine handy to rub around the top of your boiling pan and this should keep it from boiling over. The water will boil away and you just keep adding more sap to the pan. Never let your pan level go below an inch or you may burn your pan. You can mix the cold sap with the boiling sap it will still turn out alright. As you see your wood pile vanishing you may wonder if you'll ever have fresh syrup. Hold tight though because nothing is quite as tasty as some home made maple syrup! It takes roughly 40 gallons of sap to make one gallon of syrup. These numbers will vary slightly throughout the season but as a rule of thumb normally its 40:1 so plan on being at this boiling process a while. A chimney made of brick or a stove pipe (4 to 6 and 1/2 feet long) on your arch or outdoor fireplace is suggested for keeping the smoke away from the boiling sap so that the syrup will not darken or have an off-taste from the smoke.
7. As i mentioned earlier, do not leave sap in the collecting buckets for more then a few days, especially in warm weather. Ideally you should gather every time the sap runs. Also, try to store your sap in a cool area and as soon as possible. Naturally, you should boil it as quick as you can.
8. Finished maple syrup is 7 degrees F. above boiling water. Your trusty syrup or candy thermometer will show you this. We use a syrup hydrometer and a testing cup, if you decide to go larger scale you may want to use those items. A syrup hydrometer will tell you when the syrup is done. The cup will require two or three cupfuls of syrup in order to make the test. Syrup is thicker than water hence it weighs more. Accurate syrup should weigh at least 11 pounds per gallon. Don't go beyond 11 1/4 pounds per gallon or it could form crystals in the bottom and around the top of the storage container.
9. Next it is important to strain your syrup to make sure there is no dust or other debris. Pour hot syrup through a syrup filter made of felt or a strainer that you can purchase through specialty equipment dealers. If you don't have either one, a double outing flannel layer will work or, you could let the syrup cool for twelve hours or more. Sediment will settle at the bottom of your container and then you can pour off the quality syrup. Syrup should always be reheated to at least 180 degrees before it is poured into containers for final storage.
10. Now it's time to pour your hot syrup into your clean, sterile canning jars and seal. You will want them full as possible so that very little air will be in the jar. For a better seal lay your jar on it's side while the syrup is still hot.
11.Always store your syrup in a cool place. We keep ours in a unheated garage until it gets warm and then we transfer it to an air conditioned trailer that we utilize for a variety of things. If your garage is to warm or you do not have a garage or a cellar or even a basement i have read that a freezer is also ideal. Plus properly prepared syrup won't freeze on you and a poor seal will not be as important when you store your syrup in a freezer.
12.You could also visit a commercial maple producer for some more tips on how to make syrup. Most producers welcome visitors and will even give you a free tour. You can obtain locations of producers from the local extension service office in your town.
No comments:
Post a Comment